Introduction
Hello! Welcome to Massive WordPress Plugin Documentation. First of all, we convey our sincere gratitude for visiting our site. We want to assure you that development of the plugin is a continuous process and you will find the plugin a seamless one across all platforms and browsers.
We shall remain thankful to you in providing "Continuous Updates of the Plugin and Customer Support", if you have become a clan member of our UI-CLAN family by downloading or purchasing a plugin.
We have compiled here the whole documentation of Massive. This documentation is to help you in understanding each feature of the plugin. Please go through the document carefully and you will realize how easy and effective it is to use Massive for your WordPress powered site. We can reassure that your experience with Massive will be smooth and seamless and you will realize that you started your journey on the right footing.
General
This section contains list of all plugin related requirements, hosting suggestions and configuration, plugin package structure etc.
Plugin Requirements
To install and use the plugin on your site, you must be running WordPress 6.0 or higher, PHP 8.1.0 or higher, and MySQL 5 or higher. You need to have the following values setup for your site's PHP configuration. Contact your host to find out if they support these requirements.
How To Verify Current PHP Configuration
You need to verify the PHP version that is currently installed on your site. You have got couple of options on how to find the exact version. Remember, the plugin requires atleast PHP 8.1.0 to work correctly. To find the correct version of PHP you can -
-
1
Ask your hosting provider
Ask your hosting provider to tell you the configuration. If the required conditions are not met, ask them to increase the limits. -
2
Install plugin
You can also check the PHP configuration by installing this simple plugin called WP-ServerInfo. -
3
Use FTP and upload a file.
If you have FTP access to your site, upload this below file to your site root directory. This should be the same folder in which the wp-config.php exists. Once uploaded access this file using your site url as [your-site-url]/phpinfo.php. You need to extract the file from inside the zip download. Download the file
Use right-click and then choose "Save Link as" to save the file.
Note: Plugin Requirements
The above mentioned PHP configuration values are recommended for smooth working of Massive. The plugin will mostly work with even lower config, but for large sites, or while trying to import some demos, you might face some problems if the recommended configuration is not met.
Browser Support
Specifically, we support the latest versions of the following browsers and platforms. On Windows, we support Internet Explorer 11+. More specific support information is provided below.
-
Chrome
-
Safari
-
Opera
-
FireFox
-
IE 11+
Getting started
To get started you need to download the plugin package from WordPress.org "Plugins" section.
When you purchase UI-Clan plugins on CodeCanyon, you need to download the plugin files from the downloads section of your Envato account. Navigate to your downloads tab on CodeCanyon and find the plugin. Alternately, you can click this link here to go to your downloads page. If you have bought it recently, it should be on the top. Next, click the download button to see the two options. The "All files & documentation" contain the whole plugin package and has a large download size. The "Installable WordPress file only" consists of just the installable WordPress plugin zip file massive.zip.
Recommended Hosts
UI-Clan plugins can only be installed on self-hosted WordPress sites and not on WordPress servers. You can host it on WordPress.com if you have a business account. Otherwise, you will require a good hosting company to host your site.
With over 9 years of experience, we recommend you two web hosting companies that have time and again provided exceptional customer service and reliable hosting solutions. Please note, while we might receive a small commission for recommending these hosts, our recommendation is based purely on the quality of their services which is miles ahead of the others. These two hosting companies are -


Installation
You can install the plugin either by using WordPress or via FTP. The massive.zip file that you find in the plugin download package is what you need to upload to your site.
Download plugin from CodeCanyon
-
1
Visit the "Downloads" page.
After you have purchased the plugin you need to download the plugin package from the downloads page. For that go to "Downloads" tab from your account screen. -
2
Select the download package.
Once there, you need to select the type of package you want to download. You can download the all files package that has everything like documentation, licensing and the plugin files or only the "installable plugin package" that is the massive.zip file. -
3
Download the package.
Once you have selected, the download will begin automatically. Based on your selection and your internet speed, the download will take some time. -
4
Extract the plugin package.
The downloaded plugin package then needs to be extracted using an appropriate application. We recommend 7-zip for Windows or build-in extract tool for Mac to extract the contents of the package. If you had choosen the "installable plugin package" option, then you need not extract anything and the downloaded zip file is what you can upload to your site.
WordPress Dashboard Installation
Install WordPress via the admin dashboard backend. Install From The Admin Dashboard (RECOMMENDED).
-
1
Go to Plugins > Installed Plugins.
-
2
Click Add New and then click the Upload Plugin button.
-
3
Upload the plugin
Navigate to find the "massive.zip" file on your computer and click "Install Now". -
4
Activate the plugin
Activate the newly installed plugin by going to Plugins > Installed Plugins and clicking the Activate button.
Install Using FTP
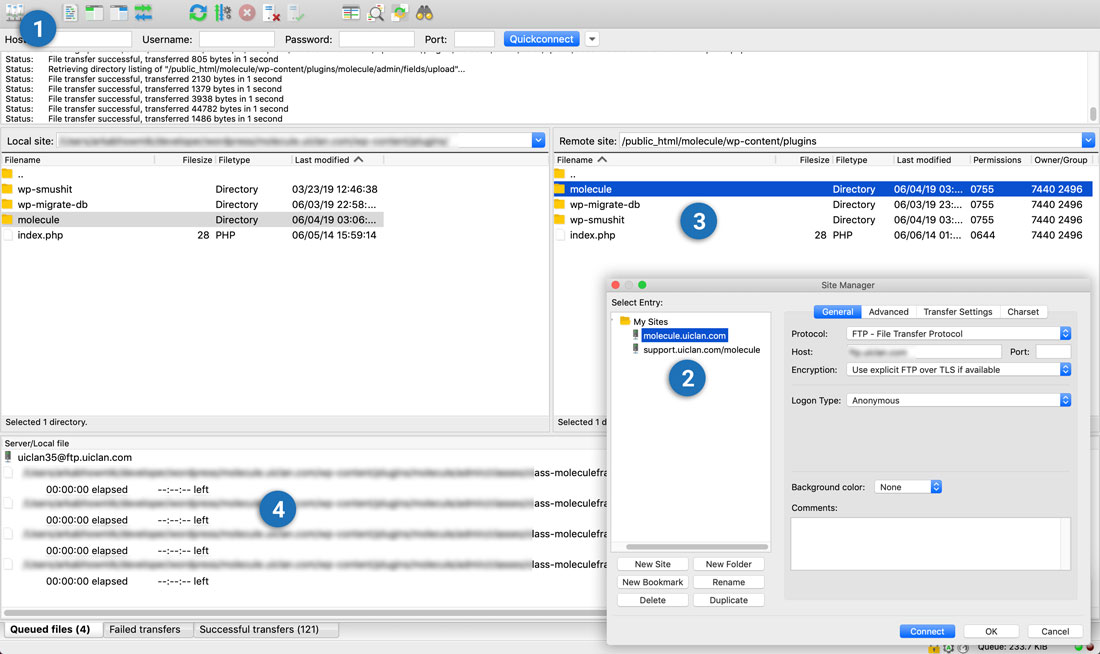
Here we have shown how to use this method on the FTP client Filezilla.
-
1
Open FTP & Add Account
Go to "Open the Site Manager" link on top and add a new site. We hope you are using the latest version of FTP client. We have shown how to use this method on FileZilla.
-
2
Add a New Site
In the site manager add the necessary FTP login and password and hostname, save the data and login. If you cannot find the necessary information ask your hosting provider to help you. If you are using cPanel, you will find everything you need in the "FTP Account" section.
-
3
Navigate to wp-content/plugin
Next step is you need to navigate to the wp-content/plugin directory on your remote site. It is on the right window. In the local directory go to where the plugin" folder is placed.
-
4
Upload Plugin
Make sure that the remote directory points to plugin folder. Upload the plugin directory on the left window to the remote site by right-clicking and choosing upload. If there is a warning message choose "Overwrite" and "Apply to current queue only" and hit OK.
Note: What to upload when?
If you are using the admin dashboard method, use zip file - massive.zip
If you are using the FTP method use folder - massive
All of these can be found in the massive-complete package. Incase you download the Installable plugin File, you can use the file to install via the admin dashboard method. You will need to extract the plugin folder from the downloaded zip file in order to use the FTP method.
-
1
Massive Auto Updater
The first and easiest method is to simply register your purchase to access our automatic plugin updater. -
2
Install via WordPress Dashboard
The second is the standard method of installing the plugin via the admin dashboard. -
3
FTP Method
You can use the FTP method to update the plugins. It is however recommended to delete the existing files or overrite them while you perform the upload. -
4
Envato Market PluginYou can use the Envato's official Market plugin hosted on Github to perform plugin updates.
Note: Important Steps Before Updating Plugin
No matter which method you use to update the plugin, here are some of the
most important steps that you should take.
1. Before you update, check update notes.
2. Make a backup of your database - VERY HIGHLY RECOMMENDED.
3. Take a backup of the plugin settings by exporting them.
Support Desk
Every license of the plugin comes with 6 months of technical support and completely free lifetime updates of the plugin.
Once the 6 months of included support is up, you have the option to extend the support period to 6 or 12 months for a nominal fee. If you do not extend your support, you will still be able to submit bug reports via email or Envato's comments section for the plugin and still have access to our online documentation and knowledge base and video tutorials and other support resources.
You can also contact us via Twitter or E-mail.
Previously, purchasing a plugin license entitled you to unlimited support and lifetime updates. But recently, the Envato license terms have been updated related to item support. You can view the updated terms here https://codecanyon.net/page/item_support_policy
Support Does Not Include :
1. Customization and installation services.
2. Support for third party software and plug-ins.
Technical Plugin Support
To get technical support from the UI-CLAN team, you have to use our ticketing system to contact us.
We use a friendly, advanced and secure ticketing system. Support is limited to questions regarding the plugin's features or problems with the plugin. We are not able to provide support for code customizations or third-party themes and/or plugins. If you need any help with more than just minor customizations of your plugin installation, consider asking a professional developer for help as we may not be able to offer such services. You need to follow the steps below to submit a ticket.
-
1
Sign Up To Create Your Support Account
Visit this page to create your support account or login to an existing account. -
2
Enter Your Purchase Code
If you have not created your account yet, you need to enter a valid purchase code to access the ticketing system. This has to be done once only when you sign up. -
3
Sign Up For Support
You then need to signup to get access to support. If you need help again you can then login using the same credentials. -
4
Follow Steps
You will then be asked to provide your necessary details and explain your plugin related issues. -
5
Submit Ticket & Wait For Reply
Once you hit submit, your ticket will be registered with us and we will contact you very soon, usually within 24 hours.
- Make sure your question is a valid plugin issue since we do not provide customization services.
- Check if the documentation or any related video guides can solve your issue.
- Try disabling the active plugins one-by-one to confirm that there is no conflict with any of them. However, if there are any conflicts, kindly let us know.
- If you have performed customizations in the plugin, confirm that you didn't make an error. If you have made changes and can't find the issue, kindly inform us about such changes.
- Most issues can be solved by doing a simple search on the internet. You may be able to solve your issue yourself quicker sometimes by following this suggestion.
- Ticketing System
- Envato Comments Section
Renew Or Extend Support
Once you have purchased the plugin you have the option to extend support while your purchase date is less than 6 months from the current date and there is less than 6 months support remaining.
The cost of extending or renewing support varies according to your purchase date with respect to when you have purchased the plugin. So, extending support during plugin purchase will cost 30% of list price in comparison to 50% during 6 months. The image below explains how the pricing is set. Kindly note that all support extension pricing percentages are set by Envato and not by us.
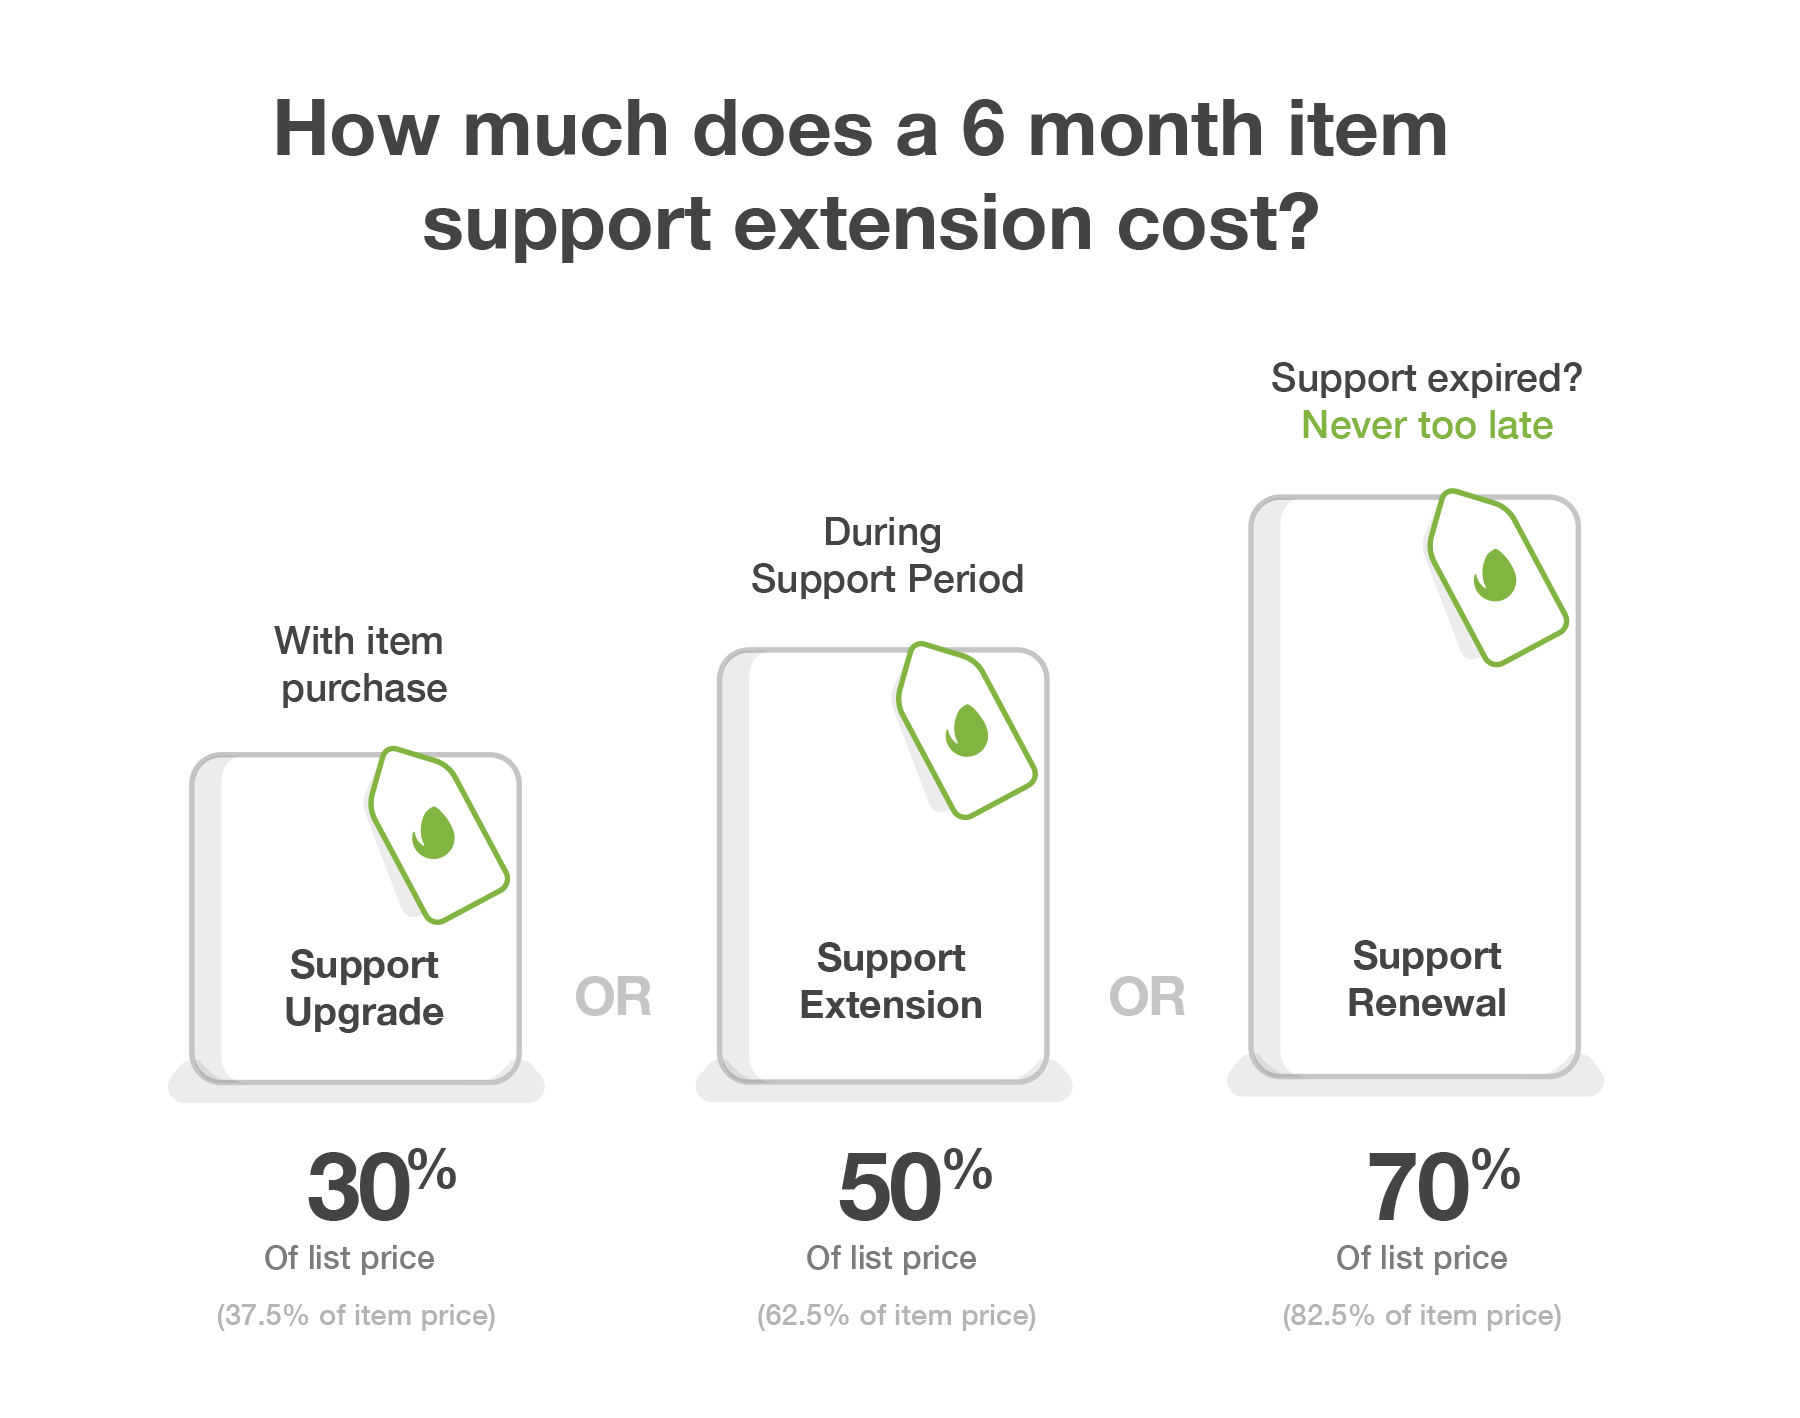
To know more you can read the Envato article on "Extending and Renewing Item Support".
Extending and Renewing Item Support
-
1
Sign in To CodeCanyon Acccount
Sign in to Envato account and go to the "Downloads section. There you will find under the plugin, a link to renew/extend the support. Click on the "Extend Now" or "Renew Now" button.
-
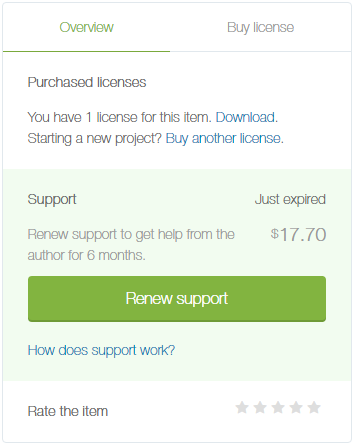
2
Renew / Extend Support
Once you click on the link you will be redirected to the plugin description page. There you will see a section on the right as shown in the image. Click of the "Renew Support" or "Extend now and save" link to update your support.
-
3
Checkout
Once you click on the button you will then be taken to the checkout page. There provide your payment details and follow the provided instructions to complete your transaction.
-
What happens if I forget to renew or entend my support?
Once the support period is over, you will not receive ticket support from the UI-CLAN team. However, you will have continued support for 6 months from the date of purchase of the plugin and thereafter if extended. -
What will I have access to after the support period has expired?
The complete online documentation, plugin updates, twitter access, knowledgebase, tutorials, polling and other support resources will still be available. The only support that you will not receive is the one-to-one direct support from the plugin authors. -
What does support include?
Support includes fixing plugin bugs and to make the plugin work on your WordPress site. We will help to solve possible compatibility related issues. Support also involves continuous lifetime updates for as long as you want. -
What does support not include?
Support does not include helping with customizations. Support also does not come with hosting or plugin installations or website setup. Support for 3rd party plugins and themes are also not provided. -
Will you help me with Plugin issues?
Indeed. As a valued UI-Clan customer you get full one-on-one support from the plugin developers. We will help you with every feature the plugin has to offer and also try to include your most requested features in future versions. We will help you to solve plugin related issues that you come across through personalised e-mail.
Changelog
You can find the version history (changelog) in the item description page for the latest changes or you can see the entire development history for the plugin since launch, online in the changelog page.
Check ChangelogCredits
Images
- Illustrations and backgrounds from Freepik.
- Images from Unsplash, Pexels, Shutterstock etc.
Mockups
- Graphic Burger
- Pixeden
- Creative Market
- PSD Covers
- Pixel Buddha
Plugins
- Image popup plugin using Magnific Popup
Fonts
- Google Fonts
- Font Awesome
- Feather
- Made Evolve Sans by MadeType
Miscellaneous
- Demo website: Around by Createx Studio.
THANK YOU !!!
Thank you once again for purchasing our plugin and going through the documentation. We hope we have been useful towards your online endeavours. Feel free to contact us anytime on any matter. Also, let us know how we can improve our documentation.
With Warm Regards,
UI-CLAN